For this project you will need:
- Fabric! In these pictures, I used Fat Quarters (fabric sold in a quarter yard, usually used for quilting), but you can use any assortment of fabrics or ribbon that you have laying around. I would say, at the very least, have about 6 different fabrics.
- Wreath base: grapevine or straw
- Rotary cutter/fancy scissors/regular old scissors
- Self healing mat (optional)
- Quilting ruler
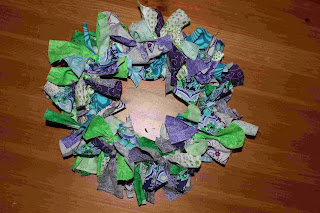
The two wreath color schemes I used. I have a ton of fat quarters just itching to be used, and I don't feel like making a quilt at the moment. =)
Cut pieces of fabric in about 2inches by 8inches. If you have ribbon, just cut in 8 inch pieces, and if your fabric isn't 2 inches wide, just cut it in 8 inch pieces. There is no real uniformity to this other than eliminating all frayed edges. The easiest way to cut fabric is by stacking it too. Especially since fat quarters should be all the same size.
Supplies are ready to go!
Start with one fabric, and tie around the fabric base in various places. When you are choosing places to tie, try and tie around various widths of the wreath base. Sometimes you will tie around the whole base, sometimes just a few strands of grapevine/straw. Also, change the direction in which you tie. Sometimes right over left, sometimes left over right.
*You can also start your wreath in a different manner. Line up your fabric/ribbon stacks, and starting in one place on the wreath, rotate colors as you work around the wreath base.
*Push the fabric together as you work to make more tying space and to create a fuller wreath.
Four of each color at this point. Clearly not enough fabric, so I push the fabric together and keep on adding.
Finished product. My wreath base was about 9 inches across. I used 9 colors and 8 pieces of fabric for each color. That's 72 pieces. Unfortunately, there is no formula (at least not one that I have created) to know how many fabric pieces you will need, but at least this is a starting point.
More wreaths that I created. I think they are really cute, and the fabric that you can use really express your personality or can be displayed for the season. The one that I created on my wall has bright orange, red, brown and a little blue...my favorite mixture of colors!
There are many variations to creating wreaths. They are easy, don't require sewing, and they don't take a lot of time. You will feel like you actually did something fancy in a short period of time. I like to cut the pieces, and then sit in front of the TV while I tie. It keeps my hands busy (I have trouble slowing down-- Type-A!), and it keeps me from snacking while I watch TV (common problem). If you want to use a styrofoam base, you can either tie all your fabric pieces around that, or cut your fabric pieces much shorter, and use push pins to put your fabric on the styrofoam. I have not tried this, but I'm sure it will work. I ALWAYS like to try new crafty things! Use fancy scissors to cut your fabric, glittery ribbon, or I have even seen this done with old cammies! Maybe use old T-shirts you hate to throw away, or baby clothes for the kids' room. Anything!
Tell me your ideas! Happy Crafting!


No comments:
Post a Comment