This project involves sewing, but if you are not an avid sewer, it's still easy. Many people/books/blogs will tell you that you need a million different sewing supplies when starting a home projects, but there are really only two things you need: a rotary cutter and a self healing cutting mat. (Of course you need pins, a sewing machine, and thread, but really? That's a given.) Having those two items will make many projects much easier. Here's what else you need:
- a quilters ruler/regular ruler/yard stick
- two pieces of fabric: 5x14 inches (bottom) and 14x10 inches (crayon pockets)
- ribbon
- velcro (optional)
- crayons
- iron
- matching thread
This is just a picture of the fabric I chose and the supplies. Like stated above, a piece of 5 x 14 fabric and a piece of 14 x 10 fabric is needed. Use your rotary cutter and your self healing mat to cut them!
Yes, I talk about wrinkles and then my fabric is wrinkled! Shame on me. Fold your 5x14(pink) fabric in half right side in, matching up the two 5 inch sides, and sew the long sides closed (this will be the crayon roll up base). When sewing the seems, use 1/4 to 1/2 seem, just stay consistent throughout the project. Don't forget to backstitch when finishing each seem! With the 10x14 (black)fabric, fold it in half long ways, and sew the top together. This will be the fabric that hold the crayons in place. Of course (I'm blonde) the black fabric I took a picture of is the wrong piece. I was doing multiple projects and took a picture of the wrong black piece. Oops!
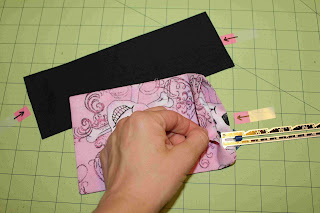
Reverse both pieces of fabric to the the right side is now facing outwards. Iron both pieces again, and create a 1/2 hem on the edges shown (with the pink arrows). With the black piece, I actually pressed it so that the seem was in the center of the fabric, and I pressed the seem open. This way, this particular seem is not visible when the project is finished.
Starting on the folded (not open) side of the pink fabric, use crayons to "measure" and pin the black fabric down to create your crayon pockets.
Before you sew, your pinning will look like this. My crayon pockets are NOT symmetrical, but all I cared about was whether a crayon would fit in each pocket. Sew straight lines where the pins are, using matching thread. Take the pins out as you sew. When you are done sewing the straight lines down for each pocket, sew across the bottom to close the pockets. We don't want any crayons falling out! *Because the top piece of fabric is black, and the bottom is pink, you can actually use pink thread for the bobbin, and black thread threaded through the machine. This will hide your seems a little better (black on top/pink on bottom). Although, I am the worst at changing out my thread as you will see in the next few pictures. I am super lazy.
Roll up your fabric and measure a piece of ribbon that will fit around it (leaving a little extra). Tuck one end of your ribbon in the open end of the pink fabric and pin it. Fold the other end of the ribbon over so that you don't have a frayed edge, and pin. Then figure out the best placement for the velcro (as seen) and pin. Sew down the velcro and sew closed the open end of the pink fabric (securing the ribbon). *If you do not want to use velcro, just use two pieces of ribbon, and you can tie closed your crayon roll rather than velcro-ing it.
Trim all thread and your finished product should look something like this! (We can hope.)
All rolled up and ready to go! Take it to a restaurant, Grandma's house,
*I am a big proponent of trial and error. I am constantly recutting and resewing pieces and trying new things. It's probably not a time saver, but I am horrible at using patterns. If any of these directions don't make sense, post a question and I'll explain a little better. Still getting a handle on this blogging thing!


I feel inspired.
ReplyDeleteI love your blogs!
ReplyDelete