Saturday, June 22, 2013

Cook a Mug

Something so simple, who would've thought! A lot of people, that's who. Anyways, I had to try it. How could a person not want to get a mug from the dollar store, and decorate it how ever they want? What a great gift--kids can do it for grandparents, a personalize it to give to a host, or a gift to send your deployed husband (me!). What you will need:


  • Sharpie (or Sharpies)
  • Mug, plate, bowl....
  • An oven!
Use your Imagination. Look online at pictures. Create whatever your would like not matter how complex or simple. Its like pottery painting with permanent markers! 


Once you are done with your creation, cook it in the oven at 350 for 30 minutes. Once you are done, turn the oven off, but don't open it. Leave your item(s) in the oven to cool. 

I forgot to take a picture of the finished product, but you get the gist! Fun!

I also created plates for my husband's 30th birthday, and it was such an easy project for a cheap price, but it looked so fancy! So fun. And if you DON'T like what you colored with the permanent marker, it scrubs off (before baking). Always, always, always, have fun!

Friday, June 21, 2013

Success or Failure.

I heard a quote today that said "Success is Scarier than Failure." I completely agree. And I am using it as an excuse as to why I haven't written on my blog in a while. Run with it....

Some more fun success/failure quotes:

"Failure is the foundation of success, and the means by which it is achieved" 


"In order to succeed, your desire for success should be greater than your fear of failure." 
-Bill Cosby

Always be yourself, express yourself, have faith in yourself, do not go out and look for a successful personality and duplicate it.
-Bruce Lee

Success is not final, failure is not fatal: it is the courage to continue that counts.
-Winston Churchill


Always bear in mind that your own resolution to succeed is more important than any other.
-Abraham Lincoln 

Losing feels worse than winning feels good.

Success is to be measured - not so much by the position that we have reached in life - as by the obstacles that we have overcome while trying to succeed.   - Booker T. Washington

Failure? I never encountered it. All I ever met were temporary setbacks.   - Dottie Walters

"Those that say they never got a chance never took one."

"No one can predict to what heights you can soar. Even you will not know until you spread your wings."   

"Your living is determined not so much by what life brings to you, but as the attitude you bring to life."   - John Homer Miller


Friday, May 31, 2013

Toilet Paper Roll Garland

So many toilet paper rolls and nothing to do! I guess you could recycle them... Or make some fun garland! On Mother's Day, my daughter and I decided to do a fun project together. We gathered some toilet paper rolls, some paint, a stapler and some string. 
First we painted the rolls (this is not a necessary step, but it's super fun for mommy and her 3 year old).
Let them dry.
Cut the toilet paper rolls in 1/2 to 2 inch strips... I don't think it really matters. My daughter tried to do this step, but the cardboard was a little tough for her to cut. 
Staple the strips together to make petals. Again, My daughter had a hard time with this, so she cut green leaves while I stapled.
A flower!
Tie the flowers together and...
Ta-dah!!!

Something pretty to hang in your house. Sometimes kids' projects are a little crazy  to be displayed all the time, not that I don't love everything my daughter colors or paints, but this is really simple and pretty. Simply fun! Add it to your activity jar!

Monday, May 13, 2013

Fabric Wreath

I am not a huge fan of wreaths honestly, but I thought this was cute. I saw a wreath somewhere (I don't remember what it looked like), and I came up with an idea to use all the little pieces of fabric have collected over the years. (I am a fabric hoarder and proud of it!) A fabric wreath! Fortunately, I was about to find a wreath base at the dollar store, so this project did not cost a lot. Unfortunately, this wreath bases are no longer available at the dollar store, and they can cost about $5 at Micheals, etc.

For this project you will need:

  • Fabric! In these pictures, I used Fat Quarters (fabric sold in a quarter yard, usually used for quilting), but you can use any assortment of fabrics or ribbon that you have laying around. I would say, at the very least, have about 6 different fabrics. 
  • Wreath base: grapevine or straw
  • Rotary cutter/fancy scissors/regular old scissors 
  • Self healing mat (optional)
  • Quilting ruler


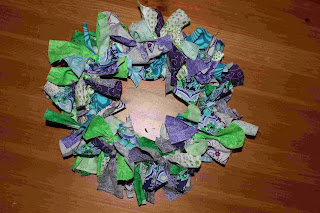
The two wreath color schemes I used. I have a ton of fat quarters just itching to be used, and I don't feel like making a quilt at the moment. =) 

Cut pieces of fabric in about 2inches by 8inches. If you have ribbon, just cut in 8 inch pieces, and if your fabric isn't 2 inches wide, just cut it in 8 inch pieces. There is no real uniformity to this other than eliminating all frayed edges. The easiest way to cut fabric is by stacking it too. Especially since fat quarters should be all the same size. 

Supplies are ready to go!

Start with one fabric, and tie around the fabric base in various places. When you are choosing places to tie, try and tie around various widths of the wreath base. Sometimes you will tie around the whole base, sometimes just a few strands of grapevine/straw. Also, change the direction in which you tie. Sometimes right over left, sometimes left over right. 
*You can also start your wreath in a different manner. Line up your fabric/ribbon stacks, and starting in one place on the wreath, rotate colors as you work around the wreath base. 
*Push the fabric together as you work to make more tying space and to create a fuller wreath. 

Four of each color at this point. Clearly not enough fabric, so I push the fabric together and keep on adding. 

 Finished product. My wreath base was about 9 inches across. I used 9 colors and 8 pieces of fabric for each color. That's 72 pieces. Unfortunately, there is no formula (at least not one that I have created) to know how many fabric pieces you will need, but at least this is a starting point.

More wreaths that I created. I think they are really cute, and the fabric that you can use really express your personality or can be displayed for the season. The one that I created on my wall has bright orange, red, brown and a little blue...my favorite mixture of colors! 

There are many variations to creating wreaths. They are easy, don't require sewing, and they don't take a lot of time. You will feel like you actually did something fancy in a short period of time. I like to cut the pieces, and then sit in front of the TV while I tie. It keeps my hands busy (I have trouble slowing down-- Type-A!), and it keeps me from snacking while I watch TV (common problem). If you want to use a styrofoam base, you can either tie all your fabric pieces around that, or cut your fabric pieces much shorter, and use push pins to put your fabric on the styrofoam. I have not tried this, but I'm sure it will work. I ALWAYS like to try new crafty things! Use fancy scissors to cut your fabric, glittery ribbon, or I have even seen this done with old cammies! Maybe use old T-shirts you hate to throw away, or baby clothes for the kids' room. Anything! 

Tell me your ideas! Happy Crafting! 

Thursday, May 9, 2013

It's never too late...

It's never too late to thank the teachers that help our kids "grow." I know that Tuesday was Teacher Appreciation Day, but this whole week is Teacher Appreciation Week. I thought this was a really cute idea and although its a little late in the game (you still have 1.5 days!), I wanted to share what Lexi and I did for her teachers. (Plus, it is a super easy idea!)
                                 Supplies: Cute paper, Card board, and yes, those are wooden skewers.

Finished product. 

These cactus flowers started blooming before we gave them to Lexi's teachers and they were sooo beautiful. I am thinking about getting some, and I am hoping since they are "cactus," I won't kill them like every other plant I have ever owned. 
There are definitely cuter ideas out there on Pinterest for teachers, but I really liked the saying on this one. And who doesn't love plants? Just an overall fun idea. 
Yay to all those awesome teachers out there who do what I could never do! Happy Teacher Appreciation Week! 

Wednesday, May 8, 2013

First Craft Fair. Ever.

Well hello bloggity bloggers and blogettes! I guess if you are reading this blog, you might not technically be a blogger, but a blog reader. Ohwell. Anyways, in true Jaime fashion, I thought that I could do anything and everything, and go to every event without any regard for time, but I just can't! Meaning: I am sorry that I have had no time to blog these past few weeks. I was preparing for my first ever craft fair!

Being the type A personality that I am, doing my first craft fair was nerve wrecking. For some reason, the closer it got to the event, the more merchandise I thought I needed. Trust me, I did not need a lot, because it was a small fair. I live on a Marine Corps Base, in a very small town, and it was in the community center on base. There were about 15-20 other vendors. I guess it was good for a first time fair. Here's my booth.
One fun thing I enjoyed doing was handing out little goodies to all the kids that passed by. It made everyone stop by my booth. Wink wink.


I made (what I call) crayon roll-ups and basically those only sold to friends (Thanks to all who visited!). It was hard to decide about pricing, and I didn't really have time to look around at the rest of the crafters before the fair started. I realized about half way through, that another table was selling these at a MUCH lower price. So I slashed prices...That didn't really help either. I'll just have to try again.

These are women's half aprons. They did not sell at all. The funny thing was that I stayed up late the night prior making Marine Corps aprons because I thought that they would sell. Who knows! So many factors.


Kid's half aprons.


Kids whole aprons. I sold a few of these, but mainly in the "Cars" print. Anything "Cars" print went like hotcakes.


Fabric wreath.

Fabric wreathes and plush owls. The owls sold really well. Kids just ate them up and everyone else thought they were cute. Although, one kid was swinging his around by the feet, and it made me question my sewing skills. I was so afraid that foot was going to fall off. Haha.


All in all, the fair went well. I sold some things, and even after buying a few things from other vendors, I ended up with a decent profit. The poor lady next to me had baked goods, and she barely sold anything. She ended up giving a lot of it away. There really wasn't a lot of shoppers there. I am not sure if it was the location, the weather, or the advertising, but I am hoping for more shoppers during the next fair.

The crafts that I chose to make were rather easy, and I am sure I will post how to do them in the near future. I always thought that the things I made were too easy and if most people can make them, why buy them? But my friend Jenni says that there are plenty of people out there that have no interest in doing crafts, so they are willing to buy them. So true. Not everyone sees a craft and says "I can do that myself." (Yes, I walk around craft fairs looking for gift ideas, sewing ideas for my daughter, and easy decor.) Anyways, I think that this may be something I do again. We will see!

Thanks again for everyone's support! A truly enjoyable experience.


Wednesday, April 24, 2013

Daily Activity Jar

Oh what to do? what to do?... That is always the question when kids are around. "Mom, I'm bored." "Mom, let's do a project." "Mom, what are we going to do today?" Well, not anymore! Create an Activity Jar!

So, most of the activities only take a few minutes, but at least it is time that you can spend with your kids, and it is exciting to pick a new daily activity. My daughter and I have really enjoyed doing daily activities, and it forces me to drop everything I am doing, and giggle with her for a little while. I used this site http://www.overthebigmoon.com/summer-activity-jar/ to start my list, but then I added quite a few things that would cater to our family. Dolly tea party. Paper boats (http://www.niftythriftythings.com/2011/08/paper-boat-place-cards.html). Silly dress up photo shoot. Wash the dogs. Write a letter to Daddy. Write a favorite things list for Daddy. Hopscotch. Etc....

Supplies: A jar, whatever you want to decorate the jar with, and little sheets of paper.

I printed out the list of activities and cut them up, because it was easier than writing them all down. Also, I used a plastic jar because I knew my three year old would be handling it. Whatever works for your family. Go Crazy with your ideas!!

                                                                Finished product!

Tuesday, April 16, 2013

Paleo Dirtcakes

As promised, I must include failures to my list of creations, as well as my successes. These Paleo cupcakes that I made for Easter were definitely a failure. I eat food that follows the Paleo Diet about 75% of the time, mainly because it makes me physically feel better, and being a Celiac (no gluten!), this diet, or way of life, caters to my family and I quite nicely.
    I was invited to a friend's house for Easter Sunday, and since she and her family were trying the Paleo Diet, I thought that it would be nice to bring cupcakes. Wrong! I chose coffee cupcakes with chocolate icing from a free book I got through Amazon Prime. (I am not going to name the book because I am sure some of the recipes are delicious.) The coffee cupcakes had cardamom, which has a spicy, cinnamony, earthy flavor that I love. I put it in my butternut squash soup. NOT good in cupcakes. They look tasty enough:
Because of the mixture of coffee and cardamom, and the lack of sweetness, the cupcakes tasted like dirt. I thought they were awful! But I was hopeful that the icing would improve the flavor. 

This icing used avocado (I am assuming instead of butter) for creaminess, honey, cocoa powder, and a few other things. Unfortunately, the grocery store only has slightly ripe avocados, so that was probably a bad idea from the start. 

Icing.

Frosted cupcakes. And yes, I call them dirtcakes. Coffee, cardamom, and the bitterness of cocoa powder just made these taste awful. I brought them to my friend's house anyways, along with a yummy sweet potato pie, and had everyone else try them too. We actually "tricked" the kids and told them we had cupcakes (which we did!). They all sat down and ate. I almost cried with laughter as they ate, but two out of four kids actually liked them and the other two made horrible faces. My friend's son said he enjoyed them, so I left the whole batch with her. I was just thankful that some got eaten. Expensive ingredients. Better luck with the Paleo Cupcakes next time. 
*On a side note, I have made paleo cookies, icecream, muffins, and pie that are yummy. So the diet is not all that bad. =)

Monday, April 15, 2013

Daddy's Old T-Shirt Dress

     I really wanted to blog about this earlier, but unfortunately I had to use my set aside "blog-time" to clean off my computer. Apparently you cannot upload new photos onto your hard drive when you only have .5GB left of memory! Who would've thought. Computer savvy, I am not.

     I came up with this idea after attempting to use an old T-shirt to make a peplum shirt for myself. I say "attempting" because although it looked cute, it was really uncomfortable and uneven. I must try again and post about that. But in the meantime, I shall post about my fabulously successful T-shirt dress for my daughter! I get so excited when things actually work on the first try.
      Things you'll need:

  • the basic sewing supplies (cutter, mat, thread, machine, pins...)
  • an old T-shirt (I used a men's medium for this size 4 kids dress)
  • a kids dress to use as a guide
  • bias tape, ribbon, or lace for the optional cap sleeves


 I used a shirt that I loved, but was all stained with paint. I figured I could mostly use unstained portions of the shirt, although there is still paint all over the dress. Next time, I'll use an unstained shirt. With this project, I used another dress as a guideline (or you could use a kids shirt as a guideline and just add length). If you don't have a dress to use as a guide, I made a few measurements, but these would only work for a size 4 dress.

 Using your chosen dress as a guide, cut the sleeveless shell of the top part of your dress. The bottom of this shell should hit mid-thigh on your little one because you are going to be adding a ruffle at the bottom. I used the existing neck whole and shoulder seems at the top.
 After cutting the shell, I folded it in half just to make sure that the sides, angles, and sleeve holes were all even.         *If you didn't have a dress (or shirt) to use as a guide, here are the measurements I took: from top to bottom it's 17 inches, 15 inches across at the bottom, 11 inches across at the bottom of the arm hole, 11 inches from the start of the arm hole down, and each shoulder is 3 inches across. I hope these extra directions make sense, or at least they give you a place to start.      

 Next, cut the piece that will ultimately become the ruffle. Using the bottom of the shirt, with the hem included, cut a piece that's 6 inches by 20 inches (that is how wide the shirt was, if your shirt is wider or smaller, I am sure it will work just fine.)        


For the cap sleeves, cut a triangle that is 5x5x7 and then cut a curved edge. Cap sleeves are definitely optional, but I thought they were cute.
Using your bias tape, ribbon, or lace (I used bias tape) fold it over and pin it to the curved part of the cap sleeves. I then used a zig zag stitch to secure the tape, and to give it a little extra detail. You could also use none of these, and just fold the curved edges over and sew a small hem.

Once your sleeves are finished, pin them to the shoulders of the dress (above). Center the sleeves and make sure that they are even. (I have a tendency to just eyeball things and regret it later.) Sew down the sleeves, and again I used a zig zag stitch.
After the sleeves are attached, pin the remainder of  the arm holes down for a very small hem, and sew a zig zag stitch very close to the edge. I feel like a large hem with this type of fabric would be very bulky in the arm hole. 

Reverse sides together, sew the sides of your dress! (after pinning of course) At this point, I actually put the dress on my daughter to check the size. I honestly thought the arm holes were too large, so I sewed diagonally inward on both sides to make them a little smaller. 

With the right side out on the top of the dress, and the right side in on the "ruffle" of the dress, place the two together as shown in the photo above. Center the "ruffle" piece. 

It is hard to see in this picture because of the resolution, but when I make a ruffle I just fold fabric in little bits and pin (starting in the center). There is no real science to it, although I attempt to give the ruffles equal spacing. There are other ways to make a ruffle, like using a basting stitch, and pulling, but I like this method best. Sew the bottom, trim all the thread, turn your dress inside out and there you have it! Cute comfiness from one of Daddy's old shirts!

Friday, April 12, 2013

Crayons on the go!

    Often my projects...wait... all of my projects involve my three year old little girl, Lexi. Whether it's to clean her up, cover her up, or shush her up, there is usually Lexi reasoning behind it. Recently I saw a cute "crayon roll up," and thought to recreate it. For my first attempt, I actually made a larger roll up, but frankly I like the size of the smaller one because it's more purse friendly. 
    This project involves sewing, but if  you are not an avid sewer, it's still easy. Many people/books/blogs will tell you that you need a million different sewing supplies when starting a home projects, but there are really only two things you need: a rotary cutter and a self healing cutting mat. (Of course you need pins, a sewing machine, and thread, but really? That's a given.) Having those two items will make many projects much easier. Here's what else you need:

  • a quilters ruler/regular ruler/yard stick
  • two pieces of fabric: 5x14 inches (bottom) and 14x10 inches (crayon pockets)
  • ribbon
  • velcro (optional)
  • crayons
  • iron
  • matching thread
When sewing ANYTHING, it is imperative that you wash the fabric first and then iron it. Wrinkles just will not do!

This is just a picture of the fabric I chose and the supplies.  Like stated above, a piece of 5 x 14 fabric and a piece of 14 x 10 fabric is needed. Use your rotary cutter and your self healing mat to cut them!

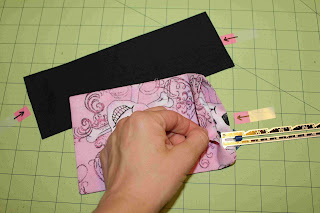
Yes, I talk about wrinkles and then my fabric is wrinkled! Shame on me. Fold your 5x14(pink) fabric in half right side in, matching up the two 5 inch sides, and sew the long sides closed (this will be the crayon roll up base). When sewing the seems, use 1/4 to 1/2 seem, just stay consistent throughout the project. Don't forget to backstitch when finishing each seem! With the 10x14 (black)fabric, fold it in half long ways, and sew the top together. This will be the fabric that hold the crayons in place. Of course (I'm blonde) the black fabric I took a picture of is the wrong piece. I was doing multiple projects and took a picture of the wrong black piece. Oops! 

Reverse both pieces of fabric to the the right side is now facing outwards. Iron both pieces again, and create a 1/2 hem on the edges shown (with the pink arrows). With the black piece, I actually pressed it so that the seem was in the center of the fabric, and I pressed the seem open. This way, this particular seem is not visible when the project is finished. 

Starting on the folded (not open) side of the pink fabric, use crayons to "measure" and pin the black fabric down to create your crayon pockets.

Before you sew, your pinning will look like this. My crayon pockets are NOT symmetrical, but all I cared about was whether a crayon would fit in each pocket. Sew straight lines where the pins are, using matching thread. Take the pins out as you sew. When you are done sewing the straight lines down for each pocket, sew across the bottom to close the pockets. We don't want any crayons falling out! *Because the top piece of fabric is black, and the bottom is pink, you can actually use pink thread for the bobbin, and black thread threaded through the machine. This will hide your seems a little better (black on top/pink on bottom). Although, I am the worst at changing out my thread as you will see in the next few pictures. I am super lazy.

Roll up your fabric and measure a piece of ribbon that will fit around it (leaving a little extra). Tuck one end of your ribbon in the open end of the pink fabric and pin it. Fold the other end of the ribbon over so that you don't have a frayed edge, and pin. Then figure out the best placement for the velcro (as seen) and pin. Sew down the velcro and sew closed the open end of the pink fabric (securing the ribbon). *If you do not want to use velcro, just use two pieces of ribbon, and you can tie closed your crayon roll rather than velcro-ing it. 

Trim all thread and your finished product should look something like this! (We can hope.)

All rolled up and ready to go! Take it to a restaurant, Grandma's house, 

*I am a big proponent of trial and error. I am constantly recutting and resewing pieces and trying new things. It's probably not a time saver, but I am horrible at using patterns. If any of these directions don't make sense, post a question and I'll explain a little better. Still getting a handle on this blogging thing!